Friday, January 28, 2011

Whoop Whoop! Chair Feature!

Well I am super jazzed and honored to have been featured on Better After today! Can you belive it! 

I find myself checking this blog throughout the day just for inspiration. I can not believe I am now a part of this amazing collection of projects! Super huge thank you to Better After! 

Here is the post including my Kitchen Chair Update.


If you want the entire tutorial you can check it out here

Thanks for the blog love...this reminds me that I should have done at least two projects this week...what a slacker! Enter excuse...busy family...5 shots for my little boy and pure TV addiction! There you have it!

I have a ton of plans...plenty of time to make them happen...and plenty of laziness getting in my way!

Photobucket

Tuesday, January 25, 2011

1 Year Old James...What a Big Boy!

James got a healthy report at the Dr. today. We had to do some allergy testing to see why little man can't seem to have eggs, cows milk or meat. Hopefully we get some answers and feeding him becomes easier soon. Developmentally James is right on track and his growth has caught up after his little stall at 9 months. 

Tall and skinny is my boy...just like his Daddy. 

2 feet 7.5 inches tall (93%)
21 pounds 13.6 ounces (32%)

On more fun details. He is walking holding on to things, he claps his hands and nods his head. His dancing is completely adorable, he seems to like all music but really dances to anything upbeat. His temper is quite entertaining and worrisome for me, he is only 1...I thought that didn't start until 2!!! We are ignoring fits now and doing our best to not laugh at some of his naughty antics. He has hands down the best reactions when his Daddy gets home. I love that time of day for many reasons (back up arriving is always great) but the main reason is its my daily reminder of what a wonderful family I have. My husband is a amazing Dad and Step Dad, proof being in the kids excitement when he gets home.

Here is a little picture overload the kiddos.


There is no saying these two are not related!

Two handsome boys in blue.

Best little lips ever!

I am so blessed to have two happy and healthy children! 

This coming weekend we will be starting on Megan's room. We have a pretty pale pink for the walls...details and pictures will be up soon!


Photobucket

Monday, January 24, 2011

Baseball Birthday for James

Well my son turned 1 this past weekend...I am amazed how time can fly by with children. We had a wonderful party for him and here are a few of the budget friendly details along with plenty of cake in the face pictures.

I designed this invitation on my killer Scrapbooking Max program and had it printed through the same company that does my printing for CK Photography. Cost about $1.00 each.

Cake! I was planning on doing a totally awesome baseball diamond big cake to go with James' baseball cake but decided the cupcakes would be cute too and same me some stress. I think they came out great and the pennants were made using my program as well. They were free since I designed and printed them. I used leftover appetizer skewers instead of toothpicks. Cakes and cupcakes were about 4 dollars I would guess...I had everything and made the frosting from scratch.

Favors were $ Store Coca-Cola glasses, socks from the Target dollar bins, erasers, pencils and note pads from the Target Valentines day goodies ($1.99 for a pack of 24). I tossed some peanuts in a zip bag and created a little label for those and we were good to go. OH...and I made little baseball thank yous for the favors as well. We actually did have two little ones included in the festivities so they were more baby friendly with rice snacks and baby sunglasses.


On to the yummy cake and fun gift opening. Its safe to say James likes to savor his sweets. He took his time picking off the red frosting until Mom helped him out a little bit. He loved his cake but was willing to share with sister. What a sweet boy!

Sorry for the picture overload.

 He was a little grumpy before the cake showed up. But I made this birthday boy sign as well! Love free cute decorations!
Are those pretty eyes or what! He is such a adorable boy! 


I was able to take the cake away 1/4 of the way eaten and had to spend a bit of time cleaning him up.


James was the best 1 year old gift opener I have seen. He sat and watched and then helped tear paper and pull tissue out. It was great. He got some wonderful gifts from our family and friends. Tomorrow I'll be designing the thank yous to send out.


Here is a shot of one of his favorite gifts, Mickey Mouse rocks! He got three of these so we will be taking back a few of them. Big Thank you to the Burnett family, Pappa Rich, Cheryl and Suzanne!


Here are all the big kids (sister, cousins, and friends) enjoying Giant's Dog's and homemade french frys. I am guessing we spent about 20 dollars on food and Capri Suns and 60 dollars on plates, napkins, balloons and a few other decorations. We had 90 balloons so it was really festive. 


My darling husband came up to me at the end of the day and sweetly asked for at least one picture of him and his son on his first birthday. How sweet is that...big fail on my part being the budding photographer though! 

I love them so much!


Hope you all had a wonderful weekend and Monday!

I'm linking this up to all my favorite link parties...check out my party page.

Photobucket
Posted by Picasa

Monday, January 17, 2011

Office Redo

Are you ready for a doozie of a before and after? I sure was!

We finally tackled our office this past weekend and I am so thrilled with it...I am anxious to finish the rest of the house now too! Good thing the weather is getting less humid, painting isn't so miserable now. 
So here ya go...please excuse the huge mess in the before pictures. You are looking at painting supplies, Christmas gifts yet to be opened by family and any other things we didn't have a place for.

Facing the front of the house, that is our front door on the left...messy and boring right!

Facing the kids rooms and laundry room. Bad flow with the desk right there.

A better view of the same direction. That door leads to the hall way that leads to the kids room and out to the garage. We walk through there all the time, the desk right there is just in the way...it will find a new home.

My husband thought my his and hers paint tray set up was cute...so he took a picture of it. As you can see I prefer the smaller roller, it seems to cover just as fast and I don't get a sore arm 2 minutes after starting the project. I got this from my mother who paints professionally and only uses these rollers...so I'm not that unusual. 


So here is the after! We did Designer White on the ceiling (Ace Hardware paint) and the walls are Light Green Gray (Sherwin Williams). Did I mention this was all free paint? Yeppers, we had the white leftover from the living room/dining room/kitchen project and the green was a freebe from my Mom. Thanks Mom! 
I love how the room looks. The green looks like it just belongs in the room and blends perfectly with the living room paint color (a custom color courtesy of my Mom again). Since these rooms are open to each other it was important that they have the same "feel" and I am pleased to say they do!


We moved the desk under the window and I love it there. I can look out at the front yard and work on the computer. The drapes are a Pottery Barn clearance bin find from last year. I love them and am thrilled to be able to enjoy them again. The drapery hardware is a $9.95 Lowe's clearance item I  found a few months ago. The light fixture is a plastic brass one that I used Rub N Buff to change it on the cheap. I had it from a previous project so it was free! I will eventually get something more suited to my tastes for here.

I am loving this new little sitting area created with two of our many dining room chairs (we have 8 in this style and 5 in another) and the ottoman our sofa came with. I would love to create a slip cover for the ottoman to give it a funky fun look and maybe make some cushions or slip covers for the chairs as well. Since this picture was taken I have added a few more little trinkets to the tray on top. It looks adorable. James enjoys knocking everything off it. Oh well!


The view from the kids room revisited. Way better right? Just picture the desk refinished...I am not sure if I want to sand it and re stain it or go in the white glazed direction. I guess that will be determined later...any suggestions would be appreciated. The top is leather so I would love to maybe find a way to treat it so it isn't brown any more. A actual desk chair would be great but for the time being I'll be making a cushion. I plan on making a faux roman shade for that small window, I just need to find the perfect fabric.


Here is another view of the sitting area. You can see James' room with the door open. It great that his room is so close. I do most of my posting during nap time and can hear when he starts to wake up.

So there you have it. I think it looks pretty awesome for a free make over using stuff we had on hand. I obviously have a few more projects from this room in the near future but for now I am going to enjoy what we have done so far.

It's James' birthday week so this week is project 1st Birthday! I need to create decorations, finalize the menu and create a awesome birthday cake for him...busy busy busy!

Stay tuned!

Check our my party page for link locations!

Photobucket
Posted by Picasa

Sunday, January 16, 2011

Kitchen Chair Update

Well I finally have some projects completed and ready to share! First up...my kichen chair update!

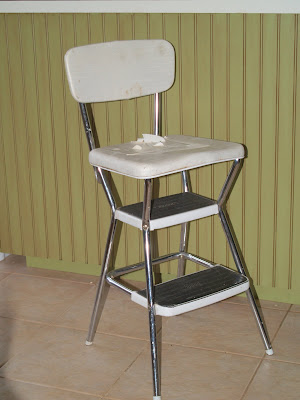
I inherited this step stool from Grandma when we purchased the house. She has had it for years and I loved it the second I saw it. Unfortunately is was a little worse for wear and was in bad need of a update. 

Here is the before...a little ho-hum for my taste. I jazzed up for free with all the stuff I had on hand from other projects.


I took the chair apart and did my best to remember how I did so I could eventually put it back together. 

Please excuse the yucky back yard...this is our HUGE project for this summer...HUGE project! I can't wait to get started on it...well back to the project at hand...painting!

Primer...ugly red brown...yuck! See how the sun is shining here...its a gorgeous day and so on...well not 5 minutes after this picture was taken it started to rain...on my freshly spray painted chair parts! How rude is that? So this project took another day longer than expected.

I recovered the chair seat and back with some fabric I had left from my kitchen table chairs. 

Here is the finished project after a coat of green spray paint and about 4 attempts of putting it back together.

I love it...its funky...its cool...its uber cute! I wish I had done this months ago!


Linked to...

Party Page Blogs and...
Thrifty Decor Chick


Stay tuned for our office before and after...yep we finally painted the office this weekend!

Until then!
Photobucket
Posted by Picasa

Monday, January 10, 2011

Clippers + Baby Boy = Big Boy

Some of you may know that I have been dreading cutting James' hair. I knew as soon as we did the baby look would be gone. But I couldn't hold out any longer, so this past Friday we did a little barber shop work on the little Mr. 

Here are some before pictures of Mr. Shaggy James in all of his adorableness.

Please excuse the less than stellar lighting...it was night time.
Cheese! Don't you love those cheeks!


Looks like a comb over right!?!

So Daddy stood by to manage baby and I put a 1" clip on our clippers and went to town. James sat really well and it was over in just a few minutes. I did clean up his ears and neck line with my scissors really quickly but he looks great...he looks like a little man and now has the most adorable bed head around.

Ladies and Gentlemen, I would like to introduce you to my little boy...James. He likes his new hair and even gave combing it a try. He looks pretty darn cute if you ask me! 


On other subjects...I have been pretty boring lately with the posts, not this one because little boys are awesome but the others. I have been working on less than thrilling things! 

Its project organization this month and I have done almost all of our closets so far. I have to tackle the kitchen and two bedroom closets and we are done with the inside. Our garage is in the most need of organization but unfortunately we will have Grandmas stuff in there until July. That makes it hard to get that area under control. We will wait until then I am sure because no one wants to clean the garage...the bonus is we don't have to freeze our booty's off to clean out the garage!  

I have also replaced a toilet water supply line...yeah thrilling I know! It was cool that I did it...and I knew what to do. So kudos to me on that one!

This weekend the husband and I took down the Christmas lights and moved the tons of bins out to the previously mentioned messy garage.  

We also cleaned out the gutters...by we I mean the husband did and I supervised, but it was good to get it done. Between the huge abundance of leaves and the huge amount of rain we have had since the beginning of December we had a plugged up gutter...not good. But its good now. Whew!

I would say this would be a good investment before next fall...it shouldn't be that hard to do right?

So needless to say there has not been much "fun" to post about. 

I am excited to work on painting our office this weekend...whoop whoop! My darling "I hate painting" husband is going to help me and once it is painted I'll have plenty of cool DIY projects and crafts to share...until then you'll have to hear about cute little boy hair cuts and healthy food. But in the grand scheme of things that isn't so bad! 

Until next time!

Photobucket

Chicken Parmesan Rollatini

Chicken Parmesan Rollatini

This was originally a recipe from this months Food Network Magazine, but I didn't have all that they asked for so I made it my own.  Plus I don't follow direction well...I like to do things my own way. As usual I encourage you to do the same. 


You will need
Garlic
Carrot
Onion
Fire Roasted Tomatoes (1 Can)
Basil
Balsamic Vinegar
Parsley
Low Fat Mozzarella Cheese
Parmesan Cheese
1 Egg White
Bread Crumbs
2 Chicken Breast pounded out to about 1/2" thick
Salt & Pepper
Cooking spray 

For the sauce I pureed 1/2 of a sweet onion, 1 large carrot, 1 spoon of minced garlic and a pinch of salt and pepper. The carrot adds extra veggie points and I like the sweetness it adds to the sauce. Saute this mixture in a nonstick pan lightly coated with cooking spray. Puree tomatoes if you like a fine texture marinara. Once veggies are tender add tomatoes and 4-5 Basil leaves tore into small pieces. I added garlic salt, more pepper and a little shot of Balsamic Vinegar for a little kick. If I wasn't feeding a little one I would have also done a sprinkle or two of Red Pepper flakes or Cayenne Pepper.
Simmer on low until pasta is ready.


I failed big time on the picture front today...sorry! But here it goes for you non visual learners. Pound chicken out using a heavy skillet or the flat side of a meat tenderizer. I put the chicken between two pieces of plastic wrap to avoid a mess. Season with salt and pepper. Turn Chicken smooth side down and sprinkle parsley and mozzarella over chicken, just enough to cover each piece, don't go all crazy with the cheese if you want this to be healthy. You are wanting a little taste of mozzarella. Roll from smallest end and secure with toothpicks.

Whip egg white until frothy and set aside. Mix 1/4 cup of bread crumbs with 1/4 cup of Parmesan cheese. Coat chicken in egg whites and bread crumbs. Lightly spray cast iron or a oven safe skillet with cooking spray and place chicken in seam side down. Bake at 450 for 20 minutes or until done.


I used this new Garden Delight pasta...its more bank for your pasta buck with a full serving of veggies in 4 oz...awesome! 

Cook according to directions about 10 minutes after you put the chicken in the oven. 


Hope you enjoy this as much as we did!

According to the FNM this chicken was 355 calories, I am not sure what my changes did to that number but really I couldn't have done that much damage! I sliced the chicken into 1/2 slices and each of us had 4 slices (about 1/2 of a chicken breast) and about 1 cup of the pasta tossed in the tomato marinara. 

Enjoy!

Photobucket
Check out my Party page for all link party locations!